Introduction
Towny succs cuz you just kill their homeblock & their town explodes & they seethe/cope quit & server dies after 1 week. Also no resource/economic differentiation between towns so theres no economy or trade.
Factions was never good.
Name based on 4craft /sci/ monkey meme
Nodes
tl;dr map painting in block game
- Map segmented into pre-created territories which are groups of contiguous minecraft chunks.
- Territories have different resource nodes which provide different resource yields from mining and different rates for farming, animal breeding, etc...
- Players form a town which controls territories. Initial territory claims must be connected.
- War is capturing territories from another town.
- Towns choose 1 territory to be their capital which cannot be taken until all other territories are captured.
- A captured territory is occupied and provides resource benefits to the occupier. The occupier has the option to annex a territory and add it to their town.
Nodes Chat Commands
Chat Settings
These change your chat channel so that when you type in chat, only members of your town, nation, or allies will see the message.
- /globalchat (or /gc): Set chat to global (default, everyone sees).
- /gc mute: Mute global chat
- /gc unmute: Unmute global chat
- /townchat (or /tc): Only town members see your chat messages.
- /nationchat (or /nc): Only nation members see your chat messages.
- /allychat (or /ac): Only town or nation allies see your chat messages.
/town (or /t)
For managing a player's town, intended to only be used ingame by players.
- /town create [name]: Create a new town with the specified name at location.
- /town delete: Delete your town. Town leaders only.
- /town promote [name]: Makes player a town officer.
- /town demote [name]: Removes player from town officers.
- /town leader [name]: Give town leadership to another player in town.
- /town apply [town]: Ask to join a town.
- /town invite [player]: Invite a player to join your town. Town leader and officers only.
- /town leave: Abandon membership in your town.
- /town kick [player]: Remove another player from your town. Town leader and officers only.
- /town spawn: Teleport to your town's main spawnpoint.
- /town spawn [outpost]: Teleport to an outpost's spawn point.
- /town setspawn: Change your town's spawnpoint to another location in the home territory. Town leader only.
- /town list: View list of all established towns
- /town info: View your town's name, leader, officers, residents, and claims.
- /town info [town]: View details of another town
- /town online: View your town's online players
- /town online [town]: View another town's online players
- /town color [r] [g] [b]: Set town territory color for dynmap. Town leader only.
- /town claim: Claim a contiguous territory for your town. Town leader and officers only.
- /town unclaim: Abandon your town's claim over a territory
- /town income: Collect income from territory bonuses. Town leader and officers only.
- /town prefix [prefix]: Set personal chat prefix
- /town prefix [player] [prefix]: Set a player's prefix (leader and officers only)
- /town suffix [suffix]: Set personal chat suffix
- /town suffix [player] [suffix]: Set a player's suffix (leader and officers only)
- /town rename [new name]: Rename your town. Town leader only.
- /town map: Prints territory map into chat for player
- /town minimap [3|4|5]: Turns on/off territory chunks minimap on sidebar. Optionally specify size value: 3, 4, or 5.
- /town permissions [type] [group] [allow/deny]: Set permissions for interacting in town territory. [type] can be: interact, build, destroy, chests, items [group] can be: nation, ally, outsider. Last entry is either "allow" or "deny"
- /town protect: Toggle protecting/unprotecting chests with mouse click.
- /town protect show: Shows protected chests with particles
- /town trust [name]: Mark player in town as trusted. Leader and officers only.
- /town untrust [name]: Mark player in town as untrusted. Leader and officers only.
- /town capital: Move town home territory to your current player location. (This also changes town spawn location.)
- /town annex: Annex an occupied territory and add it to your town
- /town outpost: Commands to manage town outposts.
- /town outpost list: Print list of town's outposts.
- /town outpost setspawn: Set an outpost's spawn point. Player must be in the outpost territory.
/nation (or /n)
For managing a player's nation, intended to only be used ingame by players.
- /nation create [name]: Create a new nation with your town as capital.
- /nation delete: Delete your nation. Leader of capital town only.
- /nation leave: Leave your nation. Used by town leaders only.
- /nation capital [town]: Set another town in your nation as its capital
- /nation invite [town]: Invite another town to join your nation. Leader of capital town only.
- /nation list: View list of all established nations and their towns
- /nation color [r] [g] [b]: Set territory color on dynmap for all towns in nation. Leader of capital town only.
- /nation rename [name]: Renames your nation. Leader of capital town only.
- /nation online: View your nation's online players
- /nation online [nation]: View another nation's online players
- /nation info [nation]: View nation's info
- /nation spawn [town]: Teleport to town inside your nation. May cost items to use.
/ally [name]
Offer/accept alliance with another town or nation.
- /ally [town]: Offer/accept alliance with a town.
- /ally [nation]: Offer/accept alliance with a nation.
/unally [name]
Break alliance with another town or nation. Towns will enter a truce period.
- /unally [town]: Break alliance with a town.
- /unally [nation]: Break alliance with a nation.
/war [name]
Declare war on other towns or nations.
- /war [town]: Declares war on a town.
- /war [nation]: Declares war on a nation.
/peace [name]
Opens peace treaty window with another town or nation.
- /peace [town]: Negotiate a peace treaty with a town.
- /peace [nation]: Negotiate a peace treaty with a nation.
/truce
View your town's remaining truce times with other towns.
- /truce [town]: View other town's remaining truce times.
/nodes (or /nd)
For printing general info about the world (e.g. resource nodes, territories, towns, nations, players). Can be used by players ingame or in console.
- /nodes help: Prints list of commands
- /nodes resource: Prints list of all resource nodes
- /nodes resource [name]: Print detailed stats of a resource node type (income, crops, animals, ore)
- /nodes territory: In console, just prints total territory count. Ingame, prints info about territory player is standing in.
- /nodes territory [id]: Prints info about territory from id
- /nodes town: Prints list of all towns, their player count and territory count
- /nodes town [name]: Prints detailed info about town from [name] (territories, players, etc...)
- /nodes nation: Prints list of all nations
- /nodes nation [name]: Prints detailed info about nation from [name] (towns, allies, enemies, etc...)
- /nodes player [name]: Prints player info (their town and nation)
- /nodes war: Print if war enabled/disabled
/nodesadmin (or /nda)
Admin command for manually modifying the world state. Intended for admin use ingame or in console. Do things like manually creating/deleting towns, or turning on war.
- /nodesadmin reload [config|listeners|world]: Reload components of Nodes engine
- /nodesadmin war [enable|disable]: Enables/disables war
- /nodesadmin town create [name] [id1] [id2] ...: Creates a town from name and list of territory ids. The first id is required and becomes the home territory. This town is created without any residents or leader.
- /nodesadmin town delete [name]: Deletes town with given name.
- /nodesadmin town addplayer [name] [player1] [player2] ...: Add list of player names [player] to town from [name].
- /nodesadmin town removeplayer [name] [player1] [player2] ...: Remove list of player names [player] from town from [name].
- /nodesadmin town addterritory [name] [id1] [id2] ...: Add list of territory from their ids to town from [name]. This ignores chunk claiming limits for a town.
- /nodesadmin town removeterritory [name] [id1] [id2] ...: Remove list of territory from their ids to town from [name].
- /nodesadmin town captureterritory [town] [id1] [id2] ...: Makes town capture list of territory from their ids
- /nodesadmin town releaseterritory [id1] [id2] ...: Releases list of territory ids from their current occupier
- /nodesadmin town claimsbonus [town] [#]: Set town bonus claims.
- /nodesadmin town claimspenalty [town] [#]: Set town penalty claims.
- /nodesadmin town claimsannex [town] [#]: Set town bonus claims.
- /nodesadmin town addofficer [town] [player]: Add officer to town
- /nodesadmin town removeofficer [town] [player]: Remove officer from town
- /nodesadmin town leader [town] [player]: Set town resident as new town leader
- /nodesadmin town removeleader [town]: Remove town's leader (makes town leaderless)
- /nodesadmin town open [town]: Toggle whether town is open to join
- /nodesadmin town income [town]: View a town's income inventory gui (must run ingame).
- /nodesadmin town setspawn [town]: Set town spawn to player location (must run ingame).
- /nodesadmin town spawn [town]: Spawn at a town's spawn
- /nodesadmin town sethome [town] [id]: Set a town's home territory
- /nodesadmin town setHomeCooldown [town] [int]: Set a town's move home cooldown
- /nodesadmin town addoutpost [town] [name] [id]: Add an outpost with name to town at territory id
- /nodesadmin town removeoutpost [town] [name]: Remove outpost from town with given name
- /nodesadmin nation create [name] [town1] [town2] ...: Creates a new nation with [name] with list of towns. [town1] required (cannot have empty nations).
- /nodesadmin nation delete [name]: Deletes nation [name].
- /nodesadmin nation addtown [name] [town1] [town2] ...: Add list of towns to nation [name].
- /nodesadmin nation removetown [name] [town1] [town2] ...: Remove list of towns from nation [name].
- /nodesadmin nation capital [nation] [town]: Make input town the new capital of nation. Town must already be part of the nation.
- /nodesadmin enemy [name1] [name2]: Sets enemy status between [name1] and [name2] (either town or nation names)
- /nodesadmin peace [name1] [name2]: Removes enemy status between [name1] and [name2] (either town or nation names)
- /nodesadmin ally [name1] [name2]: Makes [name1] and [name2] allies (either town or nation names).
- /nodesadmin allyremove [name1] [name2]: Removes alliance between [name1] and [name2] (either town or nation names).
- /nodesadmin truce [name1] [name2]: Sets a truce between [name1] and [name2] (either town or nation names).
- /nodesadmin truceremove [name1] [name2]: Removes any truce between [name1] and [name2] (either town or nation names).
- /nodesadmin debug: Console command to debug runtime world object state. General usage is /nodesadmin debug [type] [name/id] [field]
- /nodesadmin debug resource [name] [field]:
- /nodesadmin debug chunk [x,z] [field]: To input coord, format is "x,z" with no spaces
- /nodesadmin debug territory [id] [field]:
- /nodesadmin debug resident [name] [field]:
- /nodesadmin debug town [name] [field]:
- /nodesadmin debug nation [name] [field]:
Quick Nodes Guide for Brainlets
What is Nodes?
- Map is divided into different territories (see dynmap viewer)
- Different territories have different resources:
- Income: items/blocks you get over time
- Ore: item drops when mining stone (gold ore, coal, ...)
- Crops: farm crops that can grow in a region (wheat, potatos, sugarcane, ...)
- Animals: animals that can breed in a region (sheep, cows, ...)
- You and other players form towns and claim territories to use their resources
- During war, you can capture territories from other towns
Commands
- /town or /t for short is the main command.
- /nation or /n for short is for nation management.
- /war and /peace for declaring war, offering peace.
- /nodes or /nd for short has commands with info about the Nodes world.
- /gc, /tc, /nc, /ac for changing your chat channel (who can see your messages)
How to Join a Town
Request to join someone's town with /town join name, where name is their town name.
How to Form a Town
- Go to the territory location you want to create your town in
- Type /t create name, replace name with the name you want
- Invite players with /t invite playername
- Ally other towns using /ally townname
How to Claim Territories
- See ingame territory map using /t map or /t minimap
- View a territory's resources with /nd territory
- Go into the territory you want to claim and use /t claim
- Use /t unclaim to remove a territory you no longer want
Claiming territories costs town power. You get more power by having more players and total player play time on the server. Territories with important resources cost more power.
How to get Town Income
- Use /t income to view your town's income chest
- You may get income over time from territories, which gets put in this chest
- Taxes from territories captured during war also go into this chest
How to Create a Nation
- Type /n create name, replace name with the name you want
- Invite other towns with /n invite townname
How to Fight War
- Declare war on a town or nation with /war enemyname
- Attack enemy's territory by putting down a fence block in a chunk (fence is a "flag")
- You must attack from the outside of a territory
- Or attack from a captured chunk or ally territory
- The "flag" must see the sky (cannot place underground)
- Break the wool block on a flag to stop an enemy attack
- If the flag is not broken, after some time you will capture the chunk
- Turn on minimap to see where to attack: use /t minimap
- Capture a territory's home chunk ("H" symbol on the minimap) to capture the territory
Captured Territories
- Two ways to capture territory:
- Occupation: (Default) The territory is still owned by original town, but the occupier gets taxes: a portion of the territory's income and any ores mined, crops harvested, or animals bred in this territory by players goes to the occupier.
- Annexation: The territory is added to your town as a normal claimed territory.
Peace Treaties
- Negotiate peace treaties with other towns/nations using /peace [town/nation]
- This opens a Peace Treaty GUI inventory window
- After accepting peace, towns enter a truce period where they cannot war each other
Truce Periods
- Default truce periods are 48 hours
- Use /truce to view your current truces with other towns
Alliances
- Use /ally name to offer/accept an alliance with another town/nation
- Allied towns/nations cannot declare war on each other
- Use /unally name to break the alliance. You will enter a truce period after breaking the alliance.
Mechanics
This is a summary of the Nodes world structure and game mechanics for players. See the subchapters under Mechanics for more details on those topics.
Territories
- The world is divided into regions of chunks called territories.
- Each territory has unique resources:
- Income: items/blocks you get over time
- Ore: item drops when mining stone (gold ore, coal, ...)
- Crops: farm crops that can grow in a region (wheat, potatos, sugarcane, ...)
- Animals: animals that can breed in a region (sheep, cows, ...)
- Use /t map or /t minimap ingame to see the territory map.
- Use /nd territory to see the resources in the region you are standing in.
For example, a gold territory may have a high gold ore drop rate when mining stone, but no crops will grow in it (so no wheat or potato farming). Then there could be wheat territories with wheat growth, but no ores, and no other crops like potatos. There can also be good wheat territories, with full growth rate, and shitty wheat territories with half growth rate.
Territories may have any mix of ores, crops, and animals (depends on map designer). The Nodes web viewer displays territories on top of dynmap, letting you view different territories and their resources.
Towns and Nations
- Players form groups of towns.
- Towns can group together to form nations.
- If your town is in a nation, if someone declares war on your town, your entire nation will also go to war.
- Create a new town using /t create [name] in your current location. The territory you are standing in will become the town's first territory.
- Create a new nation using /n create [name].
Towns can also choose one territory to be their home territory. This territory cannot be attacked by enemies until all the other town territories are captured. Furthermore, the home territory can only be captured, but not annexed (see War).
Territory Claiming
- Towns have "power" which are points they spend to claim territories.
- More players in a town increases the town's power.
- Each player's power contribution to their town increases with play time (to a maximum value).
- A territory's power cost depends on its size and resources.
- After making a town, claim territories using /claim territory in the region you are standing in.
War
- During war, towns conquer or annex territories from other towns.
- Declare war on an enemy with /war [town/nation]. If you or your enemy is part of a nation, all towns in the nation will go to war together.
- Attack enemy's territory by putting down a fence block in a chunk (fence is a "flag")
- You must attack from the outside of a territory
- Or attack from a captured chunk or ally territory
- The "flag" must see the sky (cannot place underground)
- Break the wool or fence block in a flag to stop an enemy attack
- Use the Nodes minimap /t minimap to see what chunk you are in and where you can attack.
- Use /peace [town/nation] to negotiate peace treaties.
- After accepting peace, towns/nations will enter a truce period where they cannot declare war on each other
Capturing Territories
- Each territory has a home chunk indicated by an "H" symbol on the map (/t map or /t minimap).
- After capturing the home chunk, the entire territory is now occupied by the attacking town.
- You can conquer territories in two ways:
- Occupation: (Default) The territory is still owned by original town, but the occupier gets taxes: a portion of the territory's income and any ores mined, crops harvested, or animals bred in this territory by players goes to the occupier's /t income chest.
- Annexation: You can add the occupied territory to your town as a normal claimed territory. But you no longer get taxes (have to work land yourself).
Territories
Overview:
- Territories have unique resources (use /nd territory in a region to see)
- Towns have power which are points they spend to claim territories
- More players in a town increases the town's power.
- Each player's power contribution to their town increases over play time (to a maximum value)
- A territory's power cost depends on its size and resources
- After making a town, claim territories using /t claim in the region you are standing in

Resources
Territory resources are defined by resource nodes. These have four components:
- Income: items/blocks you get over time
- Ore: item drops when mining stone (gold ore, coal, ...)
- Crops: farm crops that can grow in a region (wheat, potatos, sugarcane, ...)
- Animals: animals that can breed in a region (sheep, cows, ...)
A resource node could be called "gold" for a territory with gold ore drops, or "wheat" for a territory with wheat growth. A territory can also have a mix of different resource nodes.
Use /nd territory in the region you are standing in to see its resources. Or use the dynmap web viewer to see the map and all territories/resources.
Other notes about resources:
- By default, crops grow and animals breed only above ground (above a minimum y-height and minimum sky light level ~14)
- Areas without territories or territories without towns do not have resources (no ore drops, crop growth, or animal breeding)
Territory Claims and Town Claim Power
Nodes uses a point system called town power for claiming territories. Each territory has a different cost depending on its size and resources (see below).
You get an initial max claim power allowed for choosing a territory to create your town in.
Afterwards, adding players to your town increases its max town power to claim territories. When a player joins a town, they add a initial amount of power, then their power contribution increases over time to a max value.
Example of this system:
- Towns get base claim power of 30. You can create town using /t create townname on any territory with cost less than or equal to 30.
- You make your town in a territory that costs 20. Your initial town power used is 20/30.
- Players add 5 initial power and 20 max power, with an increase of 1/hour.
- You add one player to your town. Immediately after your town power is now 20/35.
- Over 15 hours, your town power rises to 20/50.
- You claim a territory with cost 25. Your town power used is now 45/50.
A player's power does not decrease after it is accumulated. But if a player leaves its town and rejoins later, the player's power is reset and has to accumulate again.
The dynmap viewer has an option to turn on territory cost overlays in each territory (as shown above).
Town power and player power ramp is intended to reward player play time and reduce the impact of alt accounts (i.e. put alts in town, get free territories).
Territory Unclaim Penalty
When you unclaim a territory, your town power gets a temporary penalty equal to the territory cost. Example:
- Your current town claim power usage is 90/100 and you unclaim a 20 point territory
- You receive a temporary 20 point penalty to your town power. Your town power right after unclaiming is now 70/80.
- If the penalty decay is 1/hour, then after 20 hours the penalty will disappear and your claim power usage will go to 70/100.
This is required so towns cannot rapidly claim/unclaim territories to swap resources.
Resource Penalty when over Claim Limits
When your town is over its claim power limit, your town will have a resource penalty in all territories (default 50% penalty to income, ore drops, crop growth, and breeding rates). This can occur if players leave a town.
You will need to either get more players or reduce your town size by unclaiming territories and waiting for the unclaim penalty to disappear.
This penalizes groups that move players back-and-forth between towns to claim more territory.
Territory Cost
Territory cost model:
cost = base + rc + rs * a * chunks
- base = base cost
- chunks = size of territory
- a = fixed scale factor per chunk (so larger territories cost more)
- rs = resource scale factor (e.g. shitty resource wheat rs = 1, rare resource diamond rs = 2)
- rc = resource constant factor
For territories with multiple resources, rs and rc are the total from all resources: rs = rs1 * rs2 * ... and rc = rc1 + rc2 + ....
Resource scale factors enforce that a large territory with a rare resource is more expensive than small territory with same resource
Diplomacy and War
War
- The server admin can turn on war mode.
- During war, towns can conquer or annex territories from other towns.
- Declare war on an enemy with /war [town/nation]. If you or your enemy is part of a nation, all towns in the nation will go to war together.
- Towns can end their war with a peace treaty (see below).
- After a peace treaty is confirmed, towns enter a truce period where they cannot declare war on each other (default 48 hours)
By default, you can declare war and attack towns with no players online. If players cannot come online for war, it's expected that the towns negotiate a peace treaty before war weekend.
Attacking Territories
TODO: include screenshot showing where players can attack from
Attack enemy's territory by putting down a fence block in a chunk (fence is a "flag")
- You must attack inwards from the edge of a territory
- Or attack from a captured chunk or ally territory
- The "flag" must see the sky (cannot place underground or underwater)
- Break the wool or fence block on a flag to stop an enemy attack
- If the flag is not broken, after some time you will capture the chunk
- Capture a territory's home chunk (H on territory map) to capture the whole territory
Use the Nodes minimap /t minimap to see what chunk you are in and where you can attack.
Occupation
- Each territory has a home chunk indicated by an "H" symbol on the map (/t map or /t minimap).
- After capturing the home chunk, the entire territory is now occupied by the attacking town.
- The territory occupier gets benefits in the form of taxes from the losing town.
Taxes: A portion of the territory's income and any ores mined, crops harvested, or animals bred in this territory will go to the occupier.
Taxes are deposited into the occupiers /t income chest.
However, the occupied territory is not part of the occupier's town. The occupier cannot build, use chests, etc... in the territory.
Annexation
TODO: Conditions still being decided
- The town occupying a territory can choose to annex it.
- Annexing adds the territory into the town as a normal claimed territory.
- The annexed territory does not cost town power.
The annexed territory is same as any normal claimed territory. The town that annexed the territory can now build, use chests, etc...
The tradeoff is you no longer get taxes from another town's labor (you will need to work the territory yourself now).
Peace Treaties

- Use /peace [town/nation] to negotiate a peace treaty
- This opens peace treaty GUI window
- A peace treaty can be negotiated at any time (including before war)
- After a peace treaty is accepted, the towns will enter a truce period (default 48 hours)
- Towns under truce cannot declare war on each other
- Use /truce to see remaining truce times with other towns
Peace Treaty GUI (See Image Above)
- Left side are your town's current terms, right side are other party's current terms
- Button 1 let's you give away territories to be occupied, or release occupied territories
- Button 2 let's you give away territories to be annexed
- Button 3 rejects the current treaty
- Button 4 locks your side's terms. When both sides are locked, treaty will require final confirmation from both sides.
- Drop items into empty slots to offer items as terms
You can close the treaty menu and re-open it any time (the terms will save). Only reject the treaty if you want to delete all terms.
Alliances
- Use /ally [town/nation] to offer or accept an alliance
- Towns or nations in an alliance cannot declare war on each other
- However, declaring war on a town/nation does not bring in allies
- Use /unally [town/nation] to break the alliance.
- After the alliance is broken, the towns will enter a truce period
Towns can form alliances without a nation. When a town joins a nation, all previous alliances are removed. When a town leaves a nation, its alliances are also removed. When a nation is destroyed, all its towns alliances are removed.
Town Protections
- Set town permissions (for building, chests, doors, etc...) using
/t permissions [type] [group] [allow/deny] - There are no per-chunk, per-territory, or per-player permissions
- Protect specific chests for trusted players only using
/t protectand clicking chests - Use
/t trust [player]to trust players in your town
Permissions
Set permissions for actions in your town
(building, destroying, using doors, opening chests, etc...)
using the command below. Use just /t permissions to print current permissions.
/t permissions [type] [group] [allow/deny]
Permissions types:
- interact: use blocks (doors, buttons, ...) required for everything below
- build: place blocks
- destroy: destroy blocks
- chests: open chests
- items: use items (CURRENTLY DOES NOTHING)
- income: allow opening
/t incomechest
Permissions groups:
- town: players in you town
- trusted: trusted players in you town (using
/t trust [name]) - nation: players in your nation's towns
- ally: players in allied towns
- outsider: any player
Example 1: let players in your nation use chests
/t permissions interact nation allow/t permissions chests nation allow
Due to how permissions are set up, first you have to give general interact permissions (allows mouse clicking, opening doors, ...). Then you give additional permissions to use chests.
Example 2: let allies build/destroy (but no chest use/destruction)
/t permissions interact ally allow/t permissions build ally allow/t permissions destroy ally allow
Allies will not be able to open or destroy chests though.
That requires additional chests permission.
Chest Protections
Towns can protect certain chests so that only leaders, officers, and trusted users can open them. You can use these to store reserves of valuables that random new town residents cannot loot.
Use /t protect then click on chests that you want to protect.
Click on a non-chest block or type /t protect again to stop
selecting chests.
Containers that can be protected:
- Chests
- Trapped Chests
- Furnaces
Protected chest behaviors:
- Hoppers cannot take items out of these chests
- Untrusted players cannot open or destroy these chests
- When a protected chest is broken, its protection is removed
The town leader and officers can trust or untrust a player in the town
using /t trust [player] or /t untrust [player]. By default, new players
in the town start as untrusted.
Use /t protect show ingame to highlight protected chests (green sparkles are protected):

Configuration
This section is intended for admins, developers, and map designers.
This section describes
- World structure
- Creating/editing the world
- Best practices
Installation
This covers installing nodes onto Minecraft server. There is some manual file copying required, so this is more involved than just dragging in plugins.
Requirements
Minecraft 1.16.5
- Paper server for 1.16.5 https://papermc.io/api/v2/projects/paper/versions/1.16.5/builds/794/downloads/paper-1.16.5-794.jar
- Java 16
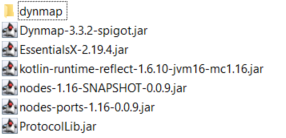
Plugin Requirements
- Dynmap-3.3.2: To display nodes map. Must be >=3.3.
- kotlin-runtime: Runtime for kotlin used for nodes.
- nodes: Nodes.
- nodes-ports: Nodes ports addon.
- Essentials: Nodes has hooks to essentials.
- ProtocolLib: Requirement for nodes.
Installation Steps
-
Run paper server so
plugins/folder is created. -
Drag in
*.jarplugins first and run server so initial config folders are generated. -
Do a dynmap render of the world first. Run server and type in server console,
dynmap fullrender [world], where[world]is your world name inserver.properties. -
Dynmap file patching:
4.1. Make sure you have a dynmap rendered with a world border like picture above.
4.2. Drag thedynmap/folder in the .zip intoplugins/so that it overwrites the built-in dynmap files contained inplugins/dynmap/. -
Nodes dynmap verification:
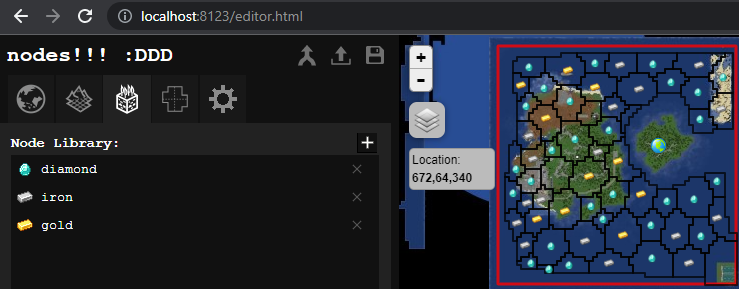
5.1. Keep paper server running so dynmap is running. Open a web browser and go to your local nodes editor at http://localhost:8123/editor.html.
5.2. Paint some nodes in map editor and downloadworld.jsonusing download button in the top-right of editor panel.
5.3. Putworld.jsonintoplugins/nodes/world.json
5.4. Restart server.
5.5. Reload http://localhost:8123/editor.html page and see to check if nodes are visible like below.
-
Nodes server verification: just type
nodesin the server console to print nodes world info. The number of territories and resources should match the map. -
Configure
plugins/nodes/config.yml
Default New Nodes .html Pages
The dynmap patches create the following html pages:
- http://localhost:8123/nodes.html: This shows only the 1st tab of the full nodes editor (world overview).
- http://localhost:8123/editor.html: This provides server manager
a local editor to paint nodes on dynmap view of the world.
This is all client side, no changes here affect the server.
Updating server world requires saving the
world.jsonand placing it in the serverplugins/nodes/world.jsonand reloading. - http://localhost:8123/empty.html: Same as editor, but world is empty, so you can paint a fresh new map.
You can copy paste these to create new web pages as needed.
If you want to replace the default dynmap page, copy the
nodes.html into a new index.html.
Nginx Dynmap Server (Optional)
Dynmap is notorious for being performance drag on servers. Since nodes does not rely on dynmap for nodes rendering, you do not actually need dynmap beyond generating the terrain image tiles. Drawback is not having dynmap to see players online or real-time map terrain updates. Summary of process is:
- Use dynmap to generate terrain image tiles
- Disable dynmap
- Use nginx to serve dynmap image tiles and the nodes javascript + world (rendering is all client side).
- Turn on dynmap whenever re-rendering world is needed.
TODO
https://github.com/webbukkit/dynmap/wiki/External-Webserver-Basics
https://github.com/webbukkit/dynmap/wiki/Dynmap-with-Nginx
World Structure
The main objects in the world structure:
- Resource nodes
- Territories
- Residents
- Towns
- Nations
Resource Nodes
Territory resources are defined by resource nodes. This allows unique resources in different regions of the world (to facilitate trade and economic differentiation). Territories have four main resource components:
- Income: items/blocks given on a periodic income schedule
- Ore: item drop rates when mining stone
- Crops: farm crops that can grow in a region and their growth speed
- Animals: animals that can breed in a region and their breed success rate
Territories contain multiple Resource nodes which contribute to the final territory resource components.
Each resource node must have a unique name to identify it (e.g. wheat or iron).
Format
Resource nodes are described by JSON objects. Below is an example with all possible fields. Only priority and cost are required, other field are all optional. The next sections detail each component.
{
    "icon": "gold_ingot",
    "priority": 50,
    "cost": {
        "scale": 1.4,
        "constant": 10
    },

    "income": {
        "gold_ingot": 64,
        "wheat": 32,
        "diamond": 0.5,
        "spawn_egg_cow": 1,
        "spawn_egg_sheep": 0.5
    },
    "ore": {
        "coal": 0.5,
        "gold_ore": [0.2, 2, 4]
    },
    "crops": {
        "wheat": 1.0,
        "potato": 0.5,
        "pumpkin": 0.8
    },
    "animals": {
        "sheep": 1.0,
        "cow": 1.0,
        "horse": 0.5
    },

    "income_total_multiplier": 1.25,
    "income_multiplier": {
        "diamond": 1.5,
        "spawn_egg_cow": 2.0
    },
    "ore_total_multiplier": 1.25,
    "ore_multiplier": {
        "gold_ore": 1.5
    },
    "crops_total_multiplier": 1.25,
    "crops_multiplier": {
        "wheat": 1.5,
        "potato": 1.5
    },
    "animals_total_multiplier": 1.25,
    "animals_multiplier": {
        "cow": 1.5,
        "horse": 2.0
    },

    "neighbor_income": {
        "gold_ingot": 64,
        "diamond": 0.5,
        "spawn_egg_cow": 1,
    },
    "neighbor_ore": {
        "coal": 0.5,
        "gold_ore": [0.2, 2, 4]
    },
    "neighbor_crops": {
        "wheat": 1.0,
        "potato": 0.5,
        "pumpkin": 0.8
    },
    "neighbor_animals": {
        "sheep": 1.0,
        "cow": 1.0,
        "horse": 0.5
    },

    "neighbor_income_total_multiplier": 1.25,
    "neighbor_income_multiplier": {
        "diamond": 1.5,
        "spawn_egg_cow": 2.0
    },
    "neighbor_ore_total_multiplier": 1.25,
    "neighbor_ore_multiplier": {
        "gold_ore": 1.5
    },
    "neighbor_crops_total_multiplier": 1.25,
    "neighbor_crops_multiplier": {
        "wheat": 1.5,
        "potato": 1.5
    },
    "neighbor_animals_total_multiplier": 1.25,
    "neighbor_animals_multiplier": {
        "cow": 1.5,
        "horse": 2.0
    }
}
All Minecraft item names (used in income and ore keys) must be in all
lowercase with spaces replaced by _.
icon
Format: "icon": "icon_name"
Name of the icon displayed in the dynmap editor. Most icons are Minecraft
item names. Animal icons are in format mob_name, such as mob_cow or mob_sheep.
This has no in-game behavior, this is purely for web editor/viewer.
priority (required)
Format: "priority": Number
This is order that resource node properties are applied to a territory. Lower priority resource nodes are applied first
cost (required)
Format 1: "scale": Number
Format 2: "const": Number
"cost": {
    "scale": 1.4,
    "constant": 10
}
This defines the resource power cost applied to the territory. See territory cost model.
"scale" (or rs) is the power cost per chunk. "const" (or rc) is the constant power cost for having this resource.
total cost = base + rc + rs * a * chunks
- base = base cost
- chunks = size of territory
- a = fixed scale factor per chunk (so larger territories cost more)
- rs = resource scale factor (e.g. shitty resource wheat rs = 1, rare resource diamond rs = 2)
- rc = resource constant factor
For territories with multiple resources, rs and rc are the total from all resources: rs = rs1 * rs2 * ... and rc = rc1 + rc2 + ....
Resource scale factors enforce that a large territory with a rare resource is more expensive than small territory with same resource
income
Format 1: "item_name": amount
Format 2: "spawn_egg_monster": amount
"income": {
    "gold_ingot": 64,
    "spawn_egg_cow": 1
}
These define items/blocks given to towns during every income cycle
(found in town income chest using /town income). Each item_name is a
normal Minecraft item name. To give spawn eggs, the name must be
"spawn_egg_monster" (e.g. "spawn_egg_sheep").
The amount can either be a Double <1.0 or Integer >1, with following effects on income:
- Amount <1.0: Performs a random roll, gives 1 item if
random() < amount - Amount >1.0: Gives the amount as an integer (casts to
Integer)
For occupation taxes, fractional amounts given to the occupier
are always rounded up using Math.ceil().
So if the income amount <= 1, for taxes it will always go to the occupier.
ore
Format 1: "item_name": drop_rate
Format 2: "item_name": [drop_rate, min_amount, max_amount]
"ore": {
    "coal": 0.5,
    "gold_ore": [0.2, 2, 4]
}
These define probabilities for items to drop when mining stone or other blocks set in config (often referred to as "hidden ore").
drop_rate is the probability that the item will drop. min_amount
and max_amount are the min and max items that drop when the event
triggers. The shorthand Format 1 "item_name": drop_rate defaults
both min_amount = max_amount = 1.
crops
Format: "crop_type": growth_rate
"crops": {
    "wheat": 1.0,
    "potato": 0.5
}
By default, no crops will grow in a territory without adding specific crops
here. An entry here enables crops of that type to grow. The growth_rate sets
the probability the crop will grow during normal crop tick. Setting
growth_rate = 1.0 means normal growth rate. Setting < 1.0 means
crops will grow slower.
Crops can be any growable block, e.g. wheat, sugar cane, pumpkin, melon, cactus, etc...
animals
Format: "animal_type": breed_success_rate
"animals": {
    "sheep": 1.0,
    "horse": 0.5
}
By default, when animals breed, there will be no child in territories without
animal settings here. An entry here enables animals of that type to breed.
The breed_success_rate sets the probability that a child will be created.
Setting breed_success_rate = 1.0 means normal breeding. Setting < 1.0 means
some breed events will fail to produce offspring.
income_total_multiplier
Format: "income_total_multiplier": Number
Multiplies all territory income values by this number.
income_multiplier
Format: "item_name": Number
"income_multiplier": {
    "diamond": 1.5,
    "iron_ore": 1.2
}
Multiplies specific territory income items by value specified.
e.g. above, diamond income gets 1.5x multiplier, iron_ore income
gets 1.2x multiplier.
ore_total_multiplier
Format: "ore_total_multiplier": Number
Multiplies all territory hidden ore drop probability by this number.
ore_multiplier
Format: "item_name": Number
"ore_multiplier": {
    "gold_ore": 1.5,
    "coal": 1.25
}
Multiplies specific territory hidden ore drop probability by value specified.
e.g. above, gold_ore probability gets 1.5x multiplier, coal probability
gets 1.25x multiplier. This does not affect min/max item drop count.
crops_total_multiplier
Format: "crops_total_multiplier": Number
Multiplies all territory crop growth probability by this number.
crops_multiplier
Format: "crop_type": Number
"crops_multiplier": {
    "wheat": 1.5,
    "potato": 1.25
}
Multiplies specific territory crop growth probability by value specified.
e.g. above, wheat growth probability gets 1.5x multiplier,
potato growth probability gets 1.25x multiplier.
animals_total_multiplier
Format: "animals_total_multiplier": Number
Multiplies all territory animal breed success probability by this number.
animals_multiplier
Format: "animal_type": Number
"animals_multiplier": {
    "cow": 1.5,
    "horse": 2.0
}
Multiplies specific territory animal breed success probability by value specified.
e.g. above, cow breed success probability gets 1.5x multiplier,
horse breed success probability gets 2.0x multiplier.
neighbor_income
Format 1: "item_name": amount
Format 2: "spawn_egg_monster": amount
"neighbor_income": {
    "gold_ingot": 4,
    "spawn_egg_cow": 1,
}
Same format as income, except this adds values to the territory's neighbor
territories (NOT the territory itself).
neighbor_ore
Format 1: "item_name": drop_rate
Format 2: "item_name": [drop_rate, min_amount, max_amount]
"neighbor_ore": {
    "coal": 0.5,
    "gold_ore": [0.2, 2, 4]
}
Same format as ore, except this adds values to the territory's neighbor
territories (NOT the territory itself).
neighbor_crops
Format: "crop_type": growth_rate
"neighbor_crops": {
    "wheat": 0.5,
    "potato": 0.5
}
Same format as crops, except this adds values to the territory's neighbor
territories (NOT the territory itself).
neighbor_animals
Format: "animal_type": breed_success_rate
"neighbor_animals": {
    "sheep": 1.0,
    "horse": 0.5
}
Same format as animals, except this adds values to the territory's neighbor
territories (NOT the territory itself).
neighbor_income_total_multiplier
Format: "neighbor_income_total_multiplier": Number
Multiplies all neighbor territory income values by this number. Only affects neighbor, NOT territory itself.
neighbor_income_multiplier
"neighbor_income_multiplier": {
    "diamond": 1.5,
    "spawn_egg_cow": 2.0
}
Multiplies specific neighbor territory income items by value specified.
Same as income_multiplier except applies to neighbor territories, NOT
the territory itself.
neighbor_ore_total_multiplier
Format: "neighbor_ore_total_multiplier": Number
Multiplies all neighbor territory hidden ore drop probability by this number. Only affects neighbor, NOT territory itself.
neighbor_ore_multiplier
Format: "item_name": Number
"neighbor_ore_multiplier": {
    "gold_ore": 1.5,
    "coal": 1.25
}
Multiplies specific neighbor territory hidden ore drop probability by
value specified. Same as ore_multiplier except applies to neighbor
territories, NOT the territory itself. Only affects probability,
not item drop min/max count.
neighbor_crops_total_multiplier
Format: "neighbor_crops_total_multiplier": Number
Multiplies all neighbor territory crop growth probability by this number. Only affects neighbor, NOT territory itself.
neighbor_crops_multiplier
"neighbor_crops_multiplier": {
    "wheat": 1.5,
    "potato": 1.5
}
Multiplies specific neighbor territory crops growth probability by value.
Same as crops_multiplier except applies to neighbor territories, NOT
the territory itself.
neighbor_animals_total_multiplier
Format: "neighbor_animals_total_multiplier": Number
Multiplies all neighbor territory animal breed success probability by this number. Only affects neighbor, NOT territory itself.
neighbor_animals_multiplier
"neighbor_animals_multiplier": {
    "cow": 1.5,
    "horse": 2.0
}
Multiplies specific neighbor territory animal breed success probability
by value specified. Same as animals_multiplier except applies to neighbor
territories, NOT the territory itself.
Intended Usage
Resource nodes are intended as composable units. This means that instead of making very specific resource nodes for each territory, it's best to make generic nodes such as a wheat, coal, horses, or iron and attach them to many different territories. Territories are intended to have multiple resource nodes. Examples of intended usage:
- Agriculture territory: this could have wheat, potato and sheep nodes
- Iron territory: this could have an iron node
- Mongolian horse steppe: this could have a horses nodes
- Coal-rich territory: because resource node names are unique, have several coal nodes: coal, coal2, coal3 with similar properties attached to this territory (can have coal and coal2 set ore mining rates while coal3 simply provides additional fixed income)
Combined Resource Node Rate Calculations
- Rates for the same property are summed together.
- Properties are added together sequentially in order of priority (low to high)
- Multipliers are applied to properties that exist when it is applied. So in general, make resource nodes with multipliers separate and with higher priority value.
Example:
resources = {
    "iron": {
        "priority": 0,
        "ore": { "iron_ore": 0.5 }
    },
    "gold": {
        "priority": 0,
        "ore": { "gold_ore": 0.5 }
    },
    "diamond": {
        "priority": 100,
        "ore:" { "diamond_ore": 0.5 }
    },
    "bonus_ore": {
        "priority": 50,
        "ore_total_multiplier": 1.5
    }
}
The sorted order will be ["iron", "gold", "bonus_ore", "diamond"]
(from sorting by priority low to high). The territory resources is
calculated as:
- Apply "iron":
resources = {
    ore = {
        iron_ore: 0.5,
    }
}
- Apply "gold":
resources = {
    ore = {
        iron_ore: 0.5,
        gold_ore: 0.5,
    }
}
- Apply "bonus_ore" (1.5x multipler on all ore):
resources = {
    ore = {
        iron_ore: 0.75,
        gold_ore: 0.75,
    }
}
- Apply "diamond":
resources = {
    ore = {
        iron_ore: 0.75,
        gold_ore: 0.75,
        diamond_ore: 0.5,
    }
}
Editor
TODO
Nametags

Nodes has a built in town nametag system (Armor Stands + teleport packet on player move).
- Requires ProtocolLib to be installed
- Set
useNametags: trueinconfig.yml
Nametags only appear for players with towns. Nametag colors are customized per viewer depending on the relationship towards the target's town:
- green: same town
- orange: neutral
- teal: ally
- red: enemy
These colors currently cannot be customized.
Design Specifications
Contains design documentation. These are high level design documentation, not api documentation.
Territory + Resource Design Specification
Date: 2022-6-19
Territories
Territories are the core unit in Nodes. These are a group of chunks with some "resource" properties attached. Territories also form a graph with adjacent territories. Below is a simplified high-level example of a territory. This design document describes how territories and resources are loaded and created in the Nodes engine.
Territory {
    // fixed structural properties
    id: 420,
    chunks: [(x0, z0), (x1, z1), (x2, z2)]
    neighbors: [TerritoryId(69), TerritoryId(9000)]

    // resource properties
    resources: ["town", "diamond"]
    income: [DIAMOND],
    crops: [WHEAT, CARROT]
    animals: [PIG]
    ore: [DIAMOND, GOLD]
    customProperties: {
        manpower: 5,
    }
}
Properties:
- Territory is a set of chunks. Chunks must map to a single territory. No territories should share chunks.
- Territories form a graph with edges between territories bordering
each other. The
neighborsobjects contains just territory ids to avoid territory pointer graph dependencies. This makes it easier to swap in / recreate territory objects on the fly (so long as overall world territory graph unchanged). - Territory fixed and resource properties should be immutable after territory is created. If these need to change, create a new Territory object.
- Territory resource properties are "fixed function": these are hard-coded properties for the most common game behaviors.
- External addons can add additional functionality using the
customProperties: Map<String, Any>.
Territory creation process
Territory creation/initialization itself can be expensive (due to creating potentially expensive data structures during initialization). Our goals:
- Territory created is immutable
- Multiple passes of resource node modification by main plugin and external addon plugins before creating final ResourceNode.
- Territory resource graph neighbor-neighbor interactions. (e.g. neighbor bonuses).
           [world.json]
                |_____________________________________
                |                                    |
                v                                    v
           Territories                           Resources
              Json                                 Json
                |____________________                |
                |                   |                |
                v                   v                |
    territoriesToBuild:      territoryResources:     |
    Map<Id, FixedProperties>  Map<Id, List<String>>  |
                |                   |           _____v______
                |                   |           | Default  |
                |                   |           | Resource |
                |                   |           |  Loader  |
                |                   |           |__________|
                |                   |                |
                |                   |           _____v______
                |                   |           | External | (Can be
                |                   |           | Resource |  multiple
                |                   |           |  Loaders |  external
                |                   |           |__________|  loaders)
                |                   |                |
                |                   |               ...
                |                   |                |
                |                   |                v
                |                   |   resources: Map<String, ResourceNode>
                |                   |                |
                |                   |                |
                |            _______v_________       |
                |           | Build Territory |      |
                |           | Resource Graph  |<-----|
                |           |_________________|
                |                   |
                |                   v
                |             resourceGraph:
                |            Map<Id, Resources>
                |                   |
                |            _______v_________
                |           | Graph           | (e.g. neighbor-neighbor
                |---------->| Message passing |  modifiers)
                |           |_________________|
                |                   |
                |                   v
                |           finalResourceGraph:
                |           Map<Id, Resources>
                |                   |
                |        ___________v_________________________
                |       | Combine territory fixed properties |
                |------>| and resources and compile          |
                        |____________________________________|
                                    |
                                    v
                                territories:
                             Map<Id, Territory>
Territory Resources Compilation
Resources are groups of "attribute" functions: A(T) -> T
Resource nodes are composed of a list of ResourceAttribute interface
objects. These are functions applied to a TerritoryResources to create a
new TerritoryResources (e.g. to add resources, or apply modifiers).
TerritoryResources {
    income: List<Item>,
    crops: List<Crop>
    animals: List<Animal>,
    ore: List<Item>,
    customProperties: Map<String, Any>,
}

ResourceAttribute {
    apply(t: TerritoryResources) -> TerritoryResources
}

ResourceNode {
    attributes: List<ResourceAttribute>
    priority: 69
}
A single TerritoryResources's "compilation" process is shown below:
- Start with a blank
TerritoryResources(or default properties). - Sort a list of resource nodes by priority (e.g. so that modifiers like bonus ore percent is applied after base ore rates are added).
- Foreach resource node, foreach attribute, apply the attribute function
to the
TerritoryResources.
t = TerritoryResources.default()

resources = [
    ResourceNode { [BonusOreAttribute], priority: 69 },
    ResourceNode { [IncomeAttribute, OreAttribute], priority: 0 },
]

for r in sort(resources, key = resource.priority()):
    for attribute in r.attributes:
        t = t.apply(attribute)
Resource Attribute Priority
Default in nodes plugin:
- Regular properties (income, crops, ore, etc.): 0
- Bonus modifiers (+10% income, +10% ore, etc.): 50
- Neighbor modifiers (+10% neighbor ore, etc.): 100
Resource Loaders and Addons
ResourceLoader interface loads json resource object tree into
resource attributes. Intermediate ResourceBuilder state is passed
through all loader systems before finishing compiling into
immutable ResourceNode object definitions.
ResourceBuilder {
    attributes: List<ResourceAttribute>

    build() -> ResourceNode
}

ResourceBuilderLibrary {
    resources: Map<String, ResourceBuilder>

    build() -> Map<String, ResourceNode>
}

ResourceLoader {
    apply(resources: ResourceBuilderLibrary, json: Json) -> ResourceBuilderLibrary
}

// load resources
loaders: List<ResourceLoader> = [
    ResourceLoaderBuiltin,
    ResourceLoaderAddon1,
    ResourceLoaderAddon2,
]

jsonResourceLibrary = loadJsonResourceSection("world.json")

resourcesToBuild = ResourceBuilderLibrary()

for resourceLoader in loaders:
    resourcesToBuild = resourceLoader.apply(resourcesToBuild, jsonResourceLibrary)

resources = resourcesToBuild.build()
External Resource Loader .jar Files
This system must support loading ResourceLoader objects from
other .jar files in nodes/addons/resources. This allow external
addons to write custom resources (e.g. resources with more customized
behavior or that modify territory customProperites).
Reloading Resources/Territories
- Reloading resources requires repeating resource loader steps and all territory re-calculations. This is expensive (full map re-calculation).
- Reloading territories requires re-calculating a territory, then recalculating all neighbors (to propagate neighbor bonuses). This requires recalculating Territory resources for reloaded territories, neighbors, AND neighbors' neighbors (two edges away). This is to make sure neighbors' neighbors modifiers are all calculated. But only direct neighbors would be updated in this process.
Why No TerritoryAttribute?
Currently territories are fixed functionality with an additional
customProperties<String, Any> map for implementing external features:
Territory {
    income: [DIAMOND],
    crops: [WHEAT, CARROT]
    animals: [PIG]
    ore: [DIAMOND, GOLD]
    customProperties: {
        manpower: 5,
    }
}
An alternative would be to decompose territory resource properties as
a set of TerritoryAttribute properites, similar to resources.
The territory above would become:
Territory {
    attributes: [
        IncomeAttribute { [DIAMOND] }
        CropsAttribute { [WHEAT, CARROT] },
        AnimalsAttribute { [PIG] },
        OresAttribute { [DIAMOND, GOLD] },
        ManpowerAttribute { 5 },
    ]
}
While this is more flexible, it incurs more development and runtime cost for checking which attributes exist in a territory. For my targeted use case, the majority of required territory functionality is just income, crops, animals, and ore. The flexibility in the above "Entity-Component" style of territory did not seem worth it.
Fixed Function Territories:
Pros:
- Development easier for main use cases (less checks for attribute existence).
- Less runtime cost for checking attribute existence in main use cases.
Cons:
- External addons must share a
customProperties<String, Any>which can be annoying to use and unsafe.
Attribute Based Territories:
Pros:
- Well defined territory API, allows more external addon flexibility.
- Lower memory usage: most territories do not need data structures for all functionalities.
Cons:
- Runtime and development cost for checking which attributes exist in territories.
Prefer Handles/IDs over References
tl;dr prefer storing handles like TerritoryId instead of direct
Territory pointer references. Avoid forming pointer dependencies.
Problem: Cancerous dependency web
Territories in particular are intended to be swapped out in real time in order to easily modify resource attributes. e.g. Players build structures in their territory which rewards new resource node.
To handle swapping out or modifying territories we have two options:
- Make territories fully mutable, modify or re-build resource
properties in real time.
- Pros: "Non-invasive". Pointer stability.
- Cons: Need to enforce that only certain systems actually modify. Can potentially become difficult to enforce.
- Keep territories mostly immutable. Re-create entire territory
when resources need to be updated.
- Pros: Systems cannot modify territory properties. Easier to reduce surface area for unknown state modifications (not guaranteed, but easier). References to object have stable properties (though not critical since codebase is currently single-threaded).
- Cons: Re-creating objects requires updating all pointer dependencies in other objects. More difficult to enforce memory safety.
We opt for 2nd option of mainly immutable objects and re-creating the object when properties need to change. This architecture however makes holding direct references difficult since all these need to be updated when the object is re-created. This creates bigger surface area for memory leaks:
Town {
    capital: Territory
    territories: ArrayList<Territory>
}

Territory {
    owner: Town
    neighbors: List<Territory>
}
If a territory is swapped out, all references to old Territory object
must be replaced in the Town and Territory. The alternative
representation is central storage of objects, while enforcing only
handle references:
TownId = int

Town {
    capital: TerritoryId
    territories: ArrayList<TerritoryId>
}

TerritoryId = int

Territory {
    owner: TownId
    neighbors: List<TerritoryId>
}

// central storages
towns = Map<TownId, Town>
territories = Map<TerritoryId, Territory>
Handles over Pointers
- Pointer stability through indirection. This adds a layer of indirection to provide pointer stability. A territory can be swapped in without affecting any other state since all access must use the central storage. This assumes overall world structure is unchanged and ids remain the same. Client must ensure these invariants are upheld.
- Additional indirection cost. However, indirection adds a map lookup to get the underlying object. This may not be great in a hot path. Need to profile/benchmark if this becomes a concern. Likely not an issue since Nodes does not run big tasks each server tick.
When Handles
Prefer handles for
- Long lived storage with interlocked dependencies (e.g. Town-Territory object dependencies). In this case, Territories are intended to be re-created in real time, while Towns are not, so use TerritoryId, but TownId not as necessary.
Ok direct references:
- Hot paths (getting Territory from TerritoryChunk, very common)
- Short lived objects that are not stored (e.g. events)
Type safe handles
Kotlin allows type safe wrappers around basic identifiers with value classes:
@JvmInline
value class TerritoryId(private val id: Int)
- https://kotlinlang.org/docs/inline-classes.html
- https://typealias.com/guides/inline-classes-and-autoboxing/
See Also
https://floooh.github.io/2018/06/17/handles-vs-pointers.html
Design Decisions
This contains a list of miscellaneous design decisions and reasoning.
Default cannot place war flags under water, require air/sky access.
If players could claim under water, then coastal cities bordering non-territory water would always be at a massive disadvantage. Players could directly attack someone's home. Even increased claim time multipliers on home + coastal chunk would not compensate for being able to just directly attack someone's home immediately.